On the face of it, there are very little similarities between your teeth and your back, right? Other than the fact that – when healthy – they both support your basic human function, albeit in very different ways.
Now think about this; what happens when your teeth are NOT healthy? Pain, difficulty eating and costly dental treatment are all likely scenarios.
Similarly, if your back health is compromised, you may experience pain, time off work, having to stop doing the things you enjoy, and costly treatment fees.
In order to avoid problems with our teeth, we visit the dentist. Regular check-ups make sure any potential problems are identified early and rectified before they become an issue.
The same can’t be said for our backs, though. What tends to happen is that we only seek help when we are in pain. By this time, poor back health is having a detrimental affect on our lives, we can’t move properly and it becomes very expensive to fix.
What if we could do the same for our back as we do for our teeth? We could identify potential issues before they become a problem, meaning no time off work, no disruption to our lives and a significant reduction in the amount of money we need to spend on it.
The good news is that now we can. Through the use of specialist MedX rehabilitation equipment, we are able to test the strength of your back, and predict the likelihood of potential back problems in the future based on your results.
To do this, we isolate and test the strength of your back muscles at various angles through your spine’s range of movement.
The force that you generate is then displayed and recorded and your results are compared to normative data for a person of the same age, gender, height and weight as you.
If your results show a weakness in your back, you may be vulnerable to back problems in the future so we’ll work to build a plan to improve your strength and work on the prevention of more serious back problems.
Back check-ups are free of charge, last 30 mins and take place from our Redcliffe studio. To book yours, complete your details below and we’ll be in touch to book you in.
With 49% of us suffering from back pain at some point in our lives, and a whopping 2.9 million days being lost due to work-related back disorders on 2014/15 (source), it’s time to take action against back pain at work and arm ourselves with the tools to prevent the onset of attacks.
With back pain related absences costing the UK economy £14bn a year (source) and a growing number of freelancers, self-employed people and other people not bring eligible for sick pay, the financial implications of back pain mean it’s not just our health which is suffering, our pockets are also feeling the pinch.
It’s not just manual workers feeling the strain either, with 50% of office workers experiencing some level of back pain. There are ways you can help prevent back pain in the office. Here are some tips on how to organise yourself, and your workstation to help prevent pain:
1. Your chair
- Raise or lower your chair so your desk is at elbow height.
- Use a foot rest to raise your feet if you need to so your hips are at a 90-degree angle.
2. Your monitor
- Position your monitor directly in front of you, not to the side.
- The top of your screen should be in line, or slightly lower than your eye line when sitting up straight.
3. Your mouse
- Position the mouse close enough to you that you can keep your elbow bent and forearm on the desk as you use it
- Train yourself to use the mouse with both hands and alternate sides
4. Your phone
- Don’t rest the phone in between your shoulder and ear
- If you need your hands free, or use the phone frequently, invest in a headset
Finally, try to take breaks every 15-30 minutes. Standing up every 15 minutes and stretching your body forwards, backwards and side to side is proven to help reduce back pain. Even if you just get up to make a drink, or visit the loo, your body will thank you for a break from maintaining a static position and giving you a chance to loosen your muscles.
Ask anyone why they don’t exercise as much as they’d like, and I’d bet that time is pretty much up there with the top 3 reasons. There are simple ways to fit exercise into your day so even the most time-poor amongst us can enjoy the benefits of being active.
1. Fit it into your everyday activities
Try including exercise into what you already do. Could you cycle or walk to work? Walk the kids to school and run back? Go for a walk on your lunch break instead of sitting at your desk? Get creative and remember that exercise goes beyond sweating it out at the gym, even just a brisk 30min walk has loads of health and fitness benefits.
2. HIIT
This is the perfect exercise for those short on time. Short, sharp intervals of intense exercise mean you can torch calories in just 20 mins. Better, still, you can…
3. Train at home
Google ‘HIIT home workouts’ or search YouTube and you’ll have access to hundreds of short workouts you can do at home with very little space and no equipment. This way you can do it whilst the baby naps, whilst dinner is cooking or when the kids are doing their homework.
4. Make it social
Rather than meeting over a cuppa or glass of wine, why not catch up with your friend for a walk in the park or jog around the neighbourhood? You can catch up on the latest in each other’s lives and as you’re chatting, you forget that you’re exercising, making it way more fun than slogging it out in the gym.
5. Get up earlier
I know it sounds obvious but going to bed half an hour earlier and getting up that half hour earlier can give you time for a short session at home before work. Even better, you’ll then be able to bask in your smug glow all day knowing you’ve done your exercise for the day.
There comes a time when every runner starts to chase their PB. We often (rightly) start our running journey with no pressure, entering races with echoes of “oh, I’m not worried about my time, I just want to finish”.
The thing is, increasing mileage teaches our body endurance, the only way we can become faster is by running faster. By introducing tempo – or lactate threshold – runs in to your training, you can increase your body’s lactate threshold – that is the point at which the body fatigues at a certain pace. In other words, your muscles can carry on contracting for longer before becoming fatigued by lactic acid levels, meaning you can run faster for longer.
How do you do it?
Aim for one tempo session a week. Start with a 10-minute easy jog then up to your tempo pace. This should be a ‘comfortably hard’ pace, one at which you’re not running flat out but still can’t manage a conversation. Stick at this pace for 20 minutes then cool down with another 5-10 min easy jog.
Build up to the 20-minute tempo block using intervals over a few weeks. Start with 5 x 3 mins at temp with a 1 min jog in between then add a minute onto your tempo time each week until you can maintain 5 mins.
If you’re training for a half marathon, run 3 miles at tempo (after a warm-up), easy jog for 5 minutes then a further 3 miles at tempo.
Using these techniques will make your training more efficient and help your muscles work better to carry you all the way to that PB.
We’ve all been there, haven’t we? You know, the day after a session in the gym or after playing some sports where your every movement induces wince-worthy pain. Let’s not even talk about stairs after leg day (or err, sitting on the toilet).
The actual term for soreness following activity is DOMS – Delayed Onset of Muscle Soreness. And man, don’t we know it? You know sometimes it’s even WORSE on day 2 following a workout? Yikes.
It’s not be feared though, the pain is likely caused by the build-up of lactic acid and microtears in the muscle fibres, and it’s through this breaking down that the muscles repair and come back stronger. It’s all good.
By the way, if you’re not sure if the pain you’re experiencing is DOMS, take a read of this post on when pain shouldn’t be ignored.
So the good news is, you can take steps to reduce the pain and though you won’t quite be bounding down the stairs the day after a date with the squat rack, you may just be able to manage it with a few less ‘eech’s’ and ‘ouches’
1. Foam rolling
It’s like ironing your muscles with a giant rolling pin. Using the roller post-workout, you can give your muscles a good stretch and boost circulation to the tissues to aid recovery.
2. Massage
Similarly (but with less effort), you can get a deep tissue massage to help reduce the severity of pain pre-workout – as is often the case with athletes and sportspeople preparing for an event – or up to 3 days post-workout to boost circulation and ease tightness.
3. Nutrition
Muscles need protein to repair. Eating a protein-rich meal following a session will help feed the tissues, reduce inflammation and aid recovery.
4. Active recovery
Ok, so sometimes the thought of even going for a walk can be painful but bear with me. Low-intensity activity can increase blood flow and nutrient delivery, as well as aiding the removal of waste products. Grin and bear it for the first few minutes, you’ll soon loosen off.
5. Take a bath
The warmth of the water is fantastic for easing sore muscles, and if you add Epsom salts to the water, the magnesium promotes absorption of vitamins and flushes out lactic acid.
We all know the adage ‘No pain, no gain’. But pain or discomfort when you’re exercising could, in fact, be your body’s way of telling you that something is up, and now’s not the time to be pushing through it.
There is, of course, the ‘good pain’ – if there can be such a thing – which we experience when we exercise, like the burning sensation in our muscles when we lift, or the can’t-walk-down-the-stairs tightness the day after a workout (the day after leg day is NEVER fun). This is totally normal, and all part and parcel of helping our muscles get stronger.
However, there are some types of pain which we should never ignore…
Pain with swelling
Swelling is the body’s natural reaction to injury. It floods the affected area with blood and fluid, which contain nutrients to feed the tissues and help it heal. Rest the affected area, keep it elevated if possible, and use ice to reduce the swelling. If the swelling persists, or returns with activity, pay a visit to your GP or sports injury professional as it may be a more severe injury.
Pain with a limited range of movement
If you’re experiencing pain in a joint, and you find you have limited movement at the same time, it could be a sign that something is in the way inside the joint, be it swelling or an obstruction. Rest, and get it checked out.
Painful popping or cracking
Small, painless pops and cracks are normal as gas bubbles pop in your joints as you move, but if you hear a pop or crack which is also painful. it could indicate a more serious tear or injury, especially if it swells after. Stop what you’re doing, elevate and ice if it’s swollen and get it checked out ASAP.
Persistent pain
Sometimes when you’re training, you get a twinge and it goes away as quickly as it came. However, if you feel pain which worsens, or doesn’t go away as you continue your session, don’t ignore it. Stop, as you may cause further damage if you continue.
With the Bristol Balloon Fiesta starting today, did you know that working on your back pain is a lot like flying a balloon? (bear with me, it’s less tenuous than it seems…)
1. Know the basics
Just like a balloon pilot needs to know about air pressure, density and wind, so you need to understand the basics of how to locate and activate your core, as it lays the foundation for all exercises you’ll do to strengthen your back.
In this clip, Sally explains how to get into the correct starting position for core work, and how to fire up your core muscles…
2. Understand the terminology
Although we try to help our clients with as little jargon as possible, there are certain phrases we teach you. By the end of your first session, just as the ballooning community throw around phrases like ‘envelope’, ‘parachute valve’ and ‘rip line’, so you’ll be familiar with what ‘fire up’, ‘table top’ and ‘glutes’ means.
3. Stay alert
During ascent, a pilot needs to stay alert and perform all their checks for the safety of the crew on board. Similarly, throughout an exercise, you need to keep in check, focus on maintaining your form and ensure that your core is engaged throughout.
Of course, your therapist will help you maintain your form and remind you to keep your core engaged, but this self-awareness is essential to practice maintaining good technique.
4. Protect yourself
Balloons are hot (who knew?) so the pilot should wear protective clothing and gloves. When you’re doing any activity which requires stabilisation from your back and core muscles, protect yourself by activating your core muscles to provide support to your spine, and your weaker muscles to stop your back ‘going’.
Think opening doors, loading the washing machine and picking up the kids. Sounds weird, but these are all triggers for back pain.
See, balloons and bad backs are more similar than you may think… and as a bonus, I now know A LOT about hot air balloons!
A client of ours sent us an email last week, expressing his thanks for enabling him to have the best night’s sleep he’d had in several months. It’s not unusual for people to come to us exhausted, following months – sometimes years – of surviving on very little sleep thanks to their back pain.
Sleep is vital for basic human function. It’s the time when our body rests and repairs. If you have back pain, that rest and repair becomes even MORE important. Yet, as so many people with back pain will tell you, getting comfortable enough for a decent night’s kip is easier said than done.
Try these strategies to help soothe you into a comfortable slumber the next time your back threatens to keep you up all night:
1. Find your position
This one is tricky as everyone has their own comfortable position, but often the position which aggravates backs the most is sleeping on your front.
In this position, your spine is in an unnatural position and unable to maintain it’s natural curve, which subsequently puts pressure on your back muscles.
If you sleep on your side, try placing a pillow in between your knees to stop your top leg sliding forward and rotating your spine.
If you sleep on your back, try a pillow under your knees or small rolled up towel in the small of your back to maintain the curve of your spine.
Keep in mind at all times the natural shape of your spine and trying to maintain that in your sleeping position. Which brings us on to:
2. Pillows
Too many or too little and you’ll have an unnatural curve in your neck. Choose a thickness which keeps your head and neck in alignment with your spine.
3. Warm bath
The warmth of the water will help relax your muscles. If you’re feeling stiff and tense, or your muscles are in spasm, this is the ideal way to encourage your body to relax as you prepare for slumber.
You’ll also experience the added mental benefits of helping relax your mind at the same time as warm baths can trigger the production of melatonin, the sleep hormone.
Salt baths are proven to reduce inflammation so using Epsom salts or magnesium in the water may also help.
4. Mattress
Getting the right amount of support is vital, and investing in a decent mattress should be a priority if you have back pain.
In terms of the support, ultimately, there is no one type of mattress which is best for all back pain, so you should choose one with the right level of support for you, whilst maintaining the comfort you need for a good night’s sleep.
Choose a mattress which supports your back and helps maintain the alignment of your spine, without sagging in the middle, for example. One study found that medium-firm mattresses usually provide more back pain relief than firm mattresses. One which is too firm may cause pressure points on your shoulders and hips, so find one where your shoulders and hips can naturally sink in slightly.
We help people sleep better and wake up without back pain.
To receive your FREE consultation, where you’ll receive a full assessment of your back pain and learn how to get rid of your back pain for good, click the button below now to register and we’ll be in touch to book you in.
If your back ever ‘goes’, you’d like to think that it was from doing something heroic, right? Something you can impress your mates with as you regale your story of courage and bravery.
Take it from someone who did their back in by picking up a piece of Lego, 9 times out of 10 people experience that terrifying locking-up from doing something slightly less bold. Think taking the washing out of the machine, closing the car door, or sneezing. Wave goodbye to your bragging rights.
The good news is that 90% of people who experience back pain will recover within 6 weeks. The aim of this stage is to stay comfortable, manage your pain and avoid making the problem worse as you recover.
If you are unlucky enough to seize up next time you pick up a pencil (really) then follow these tips for some self-care which you can do at home.
1. Don’t panic
I get it, this is easier said than done but when your back seizes up, the muscles are in spasm. The more tense you are, the less likely this spasm is to ease. Be reassured by the fact that there’s a 90% chance you’ll recover in a few weeks and try to relax as much as you can.
2. Rest for the first hour
Try and find a comfortable position when your back first locks up. To help the muscles ease, rest in this position for about an hour.
3. Take short walks
Movement is highly beneficial for back pain. When you move, your joints release a fluid which helps lubricate them. If your spine is locked up, the release of this fluid with help you move more freely and feel less stiff. In addition, your muscles will loosen off, and you’ll be helping your core muscles activate (more of that a bit later)
I get that in the initial stages, walking may be pretty uncomfortable so take it in baby steps, just walking around the house for 5-10 mins at a time at first.
4. Take Ibuprofen
Ibuprofen is both a pain-reliever and an anti-inflammatory so it can help with pain and reducing any inflammation caused by your injury. Short-term it may provide relief.
5. Keep warm
Heat therapy can work wonders on muscle spasms by increasing circulation, helping you to relax and by decreasing pain transmitters to your brain. Take a warm bath or shower or use a heat pack or hot water bottle on your low back.
6. Activate your core
You know how when you have a bad leg, you limp as your body tries to compensate and use the stronger muscles instead of the injured ones? The same can happen with back pain. Your body will try and protect your back by moving differently (which you probably won’t notice, it’s very sneaky) and not using the muscles which you need to keep your back strong.
The danger in the first 6 weeks is that your back and core muscles will weaken, which then leads to a longer-term problem and leaves to vulnerable to injury. Override this by consciously activating your core every time you move, lift and bend to maintain your strength and protect your back.
7. Keep moving
And avoid long periods of time sat down. As I mentioned before, your body needs to move to avoid seizing up so over the course of your episode, stay as mobile as you can. Take frequent breaks from your desk if you’re office-bound and try and fit in a daily walk, or some gentle exercise. Which leads nicely on to…
8. Gentle core exercise and stretches
We have an easy 10-minute routine on our YouTube channel which is ideal for people with back pain, as is yoga or pilates. You can also try some of these simple stretches for back pain. Try and avoid sit-ups, as they won’t work your deep core muscles and may put extra strain on your back.
9. Avoid bending & twisting
Your back is at it’s weakest when it’s bending and twisting at the same time. Often that’s the movement you were doing when it went in the first place. When putting washing in the machine, kneel down before you twist, and if you’re picking something up, position yourself so you don’t have to twist as you do so.
We work with people both in the initial stage of back pain and to help people get stronger and back to doing the things they love if their pain lasts longer than 6 weeks.
If you are experiencing an attack, our team can help ease your pain, get you moving freely and guide you through an exercise programme safely to avoid your problem becoming long-term. Click the button below to register today for a free consultation to see if we can help.
One of the things we love the most about core training is that you can do it anywhere with just your bodyweight, making it perfect to do at home. And it’s free, which lets face it, is always a winner.
What if we told you though, that you can challenge your core further whilst increasing your stability and balance at the same time, as well as strengthening more of the deeper core and back muscles AND make it a fun workout?
Sounds good, right? By using some simple pieces of equipment, we’ll show you how to switch up your core training to accelerate your results. All are perfect if you have back pain and will help you get stronger, move more easily and reduce your pain.
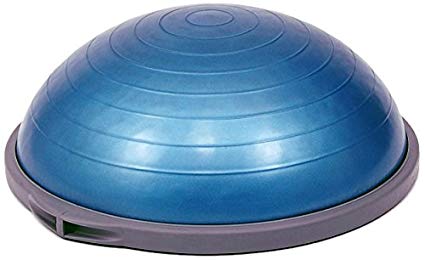
Bosu Balance Trainer
Looking like half a gym ball (or a giant jumping popper, remember them?), as it’s name suggests it can really help with balance. By recruiting more of the smaller muscles surrounding your joints, you achieve greater stability which makes it a great rehab tool for knees, hips and ankles.
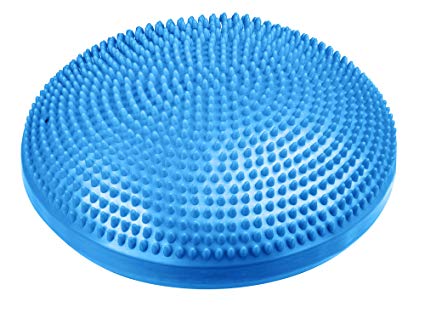
Stability Disc
By creating an unstable surface, this squishy, air filled disc forces you to use your core as you try and balance. Use it in the small of your back, under your shoulders (a particular favourite as the spiky bits give you a bit of a massage!) or even stand on them whilst performing upper body exercises for a real core challenge.
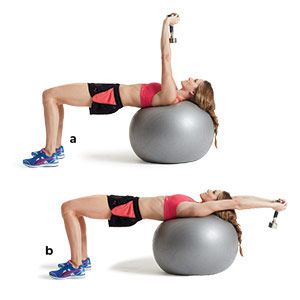
Swiss ball
These giant balls have been around for a while now and are becoming much more mainstream in gyms and training programmes. When you first start using them, you may feel like you’re going to fall off – many a time I’ve rolled off one of these, think of it as an initiation – but stick with it. From increasing your range of motion for simple sit-ups, to providing an unstable support for your legs in a plank, these balls are extremely versatile.
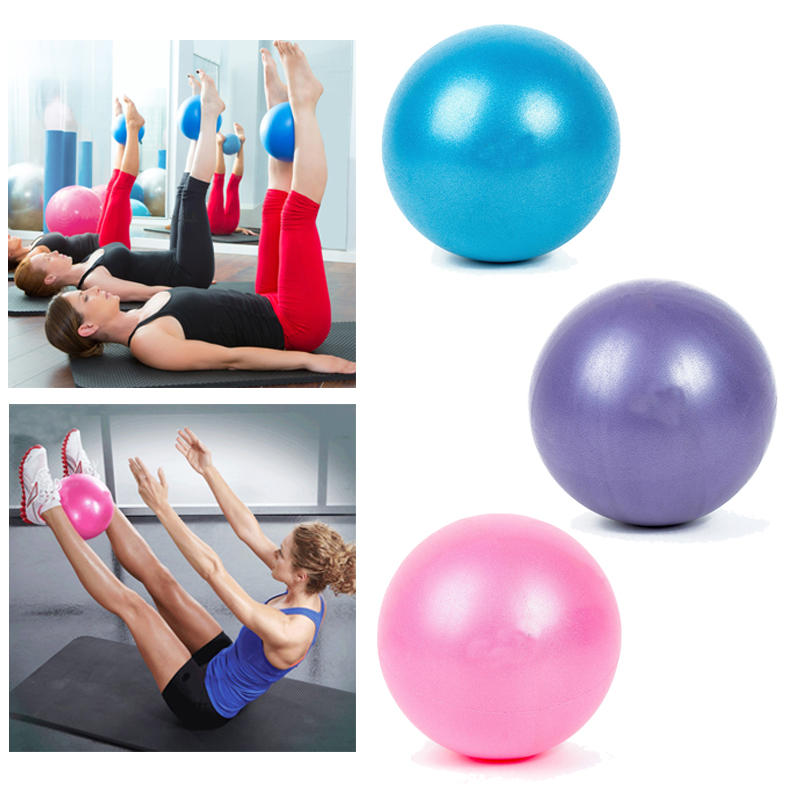
Pilates ball
Think of these as mini, squishier versions of the swiss ball. Named as such as they’re widely used in Pilates classes as a prop to encourage technique, a support for the low back and an unstable surface for certain moves. Place between your knees to maintain your position or, similar to the stability disc, place underneath the low back to increase instability and encourage your core to work more effectively.
Foam roller
Not just for ironing out knots pre and post-exercise, you can use foam rollers as a support prop as you exercise. Even killing two birds with one stone and challenging your core with moves as you roll.
Please note that the disc, swiss ball, foam roller and Pilates balls are available to purchase from our online shop.